Total Pageviews

Friday, August 24, 2012

Second blogiversary

This month marks two years since I started this blog. Has it been worth it? I think so. I often feel that I don't accomplish much, or as at least not as much as I could (if I put my mind to it), or should (if I were more diligent), or would (if I didn't spend so much time dreaming and faffing about). Keeping track of my crafty goings-on on this blog has made me realise that I do get quite a bit done. Not all of it always gets finished, of course – if it did, there'd be no reason for me to have a blog. But being answerable to someone, even only notionally (because the blog police really don't care about my craft output), has been useful.

I haven't always kept on track, of course. Various events have overtaken my project-a-month resolution this year, but still, over the life of this blog so far I've finished various long-neglected projects, including four quilts (soon to be five!),

For to my friend Diana.
On my sofa.
For my friend Bob's baby.


For no one, so far.


and two jumpers, both of which I gave to charity.  


I've also started several other projects from scratch: quite a lot of scarves,


For me.
Also for me.


For my friend Louise.

For me.
For me.

For my friend Paul.
For my friend Mark.
For me.
A prize on this blog, won by Kitty.


a cardigan for myself, 


and too many little novelties and accessories to include photos of. 

And I've extended my skills – I've become moderately accomplished at lace knitting, and I've also tried my hand at fair isle (though I haven't posted about that project yet).

This exercise has also made me much more aware of how much is in my stash.
I've organised it, and I'm even considering getting rid of all those half-balls of leftover yarn and skeins of impulse-buy novelty yarn that are taking up way too much literal and mental space. 

It's also made me realise I need to focus more on things I really want to make, instead of making bitty projects as fillers between the more interesting ones. I do a lot of that, and end up with more fillers than main projects, which is really just a waste; why waste time on projects you're half-hearted about when you could be spending it to make things you really love?

So in that spirit I recently spent $150 on pure wool from Bendigo Woollen Mills to knit a blanket that I've coveted for several years, from the moment I first saw it in Joelle Hoverson's Last-Minute Knitted Gifts.

It's an ombre effect, shading from cream through various neutrals and
browns to dark brown. Eventually!


And you know what? It's really, really satisfying to be making something I've wanted for so long. More on this project another time. 

Tuesday, August 7, 2012

Project-a-month resolution: June

Well, I wrote this post a while ago, but somehow failed to actually publish it. I blame my total technical ineptitude.

Anyway, this is what was happening in June ...

With winter here, I decided I needed a couple of new scarves more than I needed yet another quilt, so this month, unfinished projects have taken a backseat to new ones.

First up, I wanted to use a yarn I've had for about five years. I bought it to make socks with, but I've since realised that a) I'm unlikely to make socks any time soon, and b) if I do, it's probably a bit dumb to use nice yarn for my first effort. So instead I made a scarf from Joelle Hoverson's excellent Last-Minute Knitted Gifts. It's a very easy-to-remember chevron pattern.

Because I'm a symmetry freak, I made it in two pieces, then grafted them together in the middle. Knitting guru Maggie Righetti says that stocking stitch grafting is so easy that even a beginner can whizz across a row of it in no time. I'm far from a beginner, but grafting baffles me at every attempt. I have to consult books (note the plural) and have about six goes at it before I get it not-quite-right. So it was with this scarf, but the two bits joined up eventually.

Normally grafting is done with the knitting still on the needles, but I can never follow
the rhythm of the stitches that way. This time I threaded crochet cotton through the
stitches and taped the cotton onto a board, which made it easier. 

In progress...

And done.

It was pretty crinkly when I finished it, so I did some steam-blocking with the iron. And voila, ready to wear.


Next I wanted a pattern to show off some new Noro Silk Garden I bought recently.

It's colour 84. Slightly scratchy to wear, but very beautiful.

I experimented with some lace patterns but nothing seemed right, so I rethought it. Abandoning my tendency to overengineer just about everything, I knitted it in garter stitch, with three stitches of stocking stitch at both ends of every row. This gives a neat edge that rolls back on itself so that the scarf is reversible.


I'm pretty pleased with it. I love the autumnal tones and the way they shade subtly into each other. Some more steam blocking to iron out a bit of waviness along the edges, and it was ready to go.


And now July's challenge is to finish another quilt.


Wednesday, July 4, 2012

Project-a-month resolution: May

It's July already and I haven't posted about May yet. Blogging, work and everything else were overtaken by the recent death of my mother.

Before Mum became ill, I did finish the red tweed cardigan:

It's a Jo Sharp pattern knitted in Morris Woollahra 10-ply.

The pattern was easy to follow, and while I'm pleased with the actual knitting – it's neat, and I managed to finish it nicely – the fit isn't perfect. It's slightly too big for me, so I dunked it in hot water then rinsed it in cold to see if I could shrink it a bit. That worked to an extent, but the shoulders are still a little too Schwarzenegger for me, so I might have to unpick the shoulder seams and bring them in a bit. Sigh.


That's all for this post. Back to normality soon, I hope.


Friday, April 27, 2012

Project-a-month resolution: April

The resolution hit an unexpected and interesting detour this month. Rather than finishing something old, I was working on a commissioned project. Being paid to craft  – how good is that?


I can't reveal what it is it until the client has unveiled it, so will post about it later. But it was fun, challenging and took me 45 hours during March and April, so I've been hard at it.


I've also started a tweed cardigan for myself in this cheery shade:


The weather is starting to cool down here. This always makes me very happy, as winter is my favourite season. Even more excuse (as if one were needed!) to sit on the sofa engrossed in my knitting.


Tuesday, April 17, 2012

From the craft archives


I was at my mum's place over Easter and she still has this displayed in the spare bedroom. I made it when I was about 15. 

Retro-groovy, or worthy of Regretsy? I can't decide!


In my defence, it was the 1970s...

Whether it's hideous or not, this project taught me a lot of embroidery stitches and techniques I'd never encountered before. I guess I could look on it as the hippie equivalent of a sampler!


I also took a photo of the granny-square rug that I made when I was twelve, and which started my love affair with craft.


I like to think my tastes are a little more restrained these days!


Saturday, March 24, 2012

Project-a-month resolution: March


This is a quilt I started about twelve years ago. It was meant to use up the scraps from another quilt (still unfinished, naturally) that I made out of Japanese prints in indigo and green. I didn't put a lot of thought into it, just cobbled it together. In hindsight, I could have made better use of the fabrics. Oh, well – live and learn.


The quilting is a mixture of machine and hand. I did a few lines of straight machine quilting on the cream parts, and started hand quilting the patterned strips, then lost interest. I didn't really like the combination of machine and hand quilting, and I considered unpicking the machining and re-quilting it by hand – as though that was ever going to happen! Hence its relegation to the Chest of Shame for several years.


What appeals to me about Japanese prints is the mixture of traditional designs …


… and wacky ones. Purple chillies and mixed seafood, anyone?

I still don't love the combination of machine and hand quilting, but it's there and it's staying. I've done the hand quilting in a criss-cross pattern. I bound the quilt in another Japanese print that I had hanging around; my economical side (usually thoroughly repressed) rejoices that I didn't have to spend an extra cent on this project.


It's not my greatest creative moment, but it's okay, and it's finished, and that's good enough for me.


Sunday, March 11, 2012

How to make a felt e-reader cover

I've never been one for gadgets, unless they're the kitchen type. Technological gadgets leave me cold, but I recently bought a Kindle, as even a committed Luddite can see that carrying an e-reader is much handier than lugging books about. I plan to keep mine in my bag at all times, in case of bus queues on the harbour bridge, unpunctual friends, and other time-killing situations.

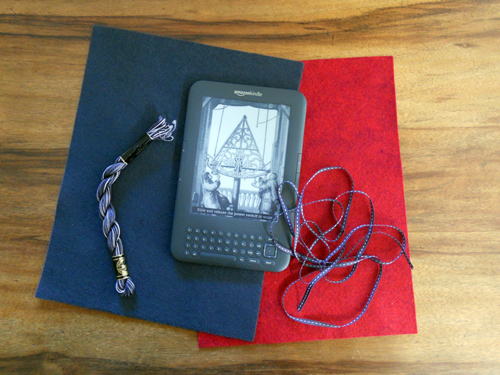
I know you can buy those vinyl folder things to protect e-readers, but really, how boring. I decided to make my own cover from two bits of felt I bought yesterday at Calico and Ivy in Balmain. If you want to make one too, here's how.

You could adapt these instructions for other gadgets, of course – just leave about 1 cm (1/2 inch) all round, for the seam and so you can get your gadget in and out of the cosy without shoving.

1. You will need two pieces of felt, some embroidery thread and a piece of ribbon, as well as general sewing supplies.


2. Cut a piece of felt 15 x 19 cm (6 x 7 1/2 inches) for the front of the cover.

3. Cut a piece of felt 15 x 27 cm (6 x 10 1//2 inches) for the back and flap of the cover.

4. Using your Kindle as a template, trace around its curves at all four corners of the back and flap piece, and around the bottom corners only of the front piece. Cut away the corners.


5. Matching the raw edges, pin the two pieces together.


6. Tack the two pieces together. Remove the pins.


7. If you have a straight eye, or don't mind wonky lines, you can sew without ruling a line first. Otherwise, rule a line using tailor's chalk, as I did, about 5 mm (1/4 inch) in from the edges.

8. Thread a needle with embroidery thread (I used variegated pearl cotton) and knot the end. Start sewing near where the two pieces join. Bring the needle up from the inside of the pouch to conceal the knot. Make a couple of backstitches across the join of the two pieces to reinforce.


9. Work a line of running stitch around the edge of the flap. When you get to the join on the other side, make another couple of backstitches to reinforce, then keep going with the running stitch all the way around the pouch.

10. Once you return to your starting point, make a couple of small backstitches on the back of the work, fasten the thread, pass the needle inside the pouch to conceal the end of the thread, and cut the thread off.


11. Sew a length of ribbon to the middle of the flap, insert your Kindle, tie the ribbon around it and you're ready to go. Happy e-reading!